Soft Small Wholemeal Rolls are perfect for school lunch boxes, especially now that school is back and the busy school days are here again. I don’t know about you, but once the school term starts, the days seem to fly by. Between homework, clubs, activities and activities, the evenings can feel like a complete whirlwind.
That’s why I do my best to spend a couple of hours at the weekend getting a few homemade snacks ready for the freezer. It might not sound like much, but having something homemade ready to grab on a busy morning makes such a difference during the week.
Perfect for the freezer
One of my favourite things about making these Soft Small Wholemeal Rolls is that they freeze really well. Once they have cooled completely, pop them into a freezer bag or airtight container and freeze them. Then, when you’re packing lunch boxes, you can simply take out what you need. They’ll thaw during the morning and be ready for lunchtime.It’s one less thing to think about on those busy school mornings!


A little weekend prep goes a long way
I’m a big fan of doing a little bit of preparation at the weekend rather than trying to do everything during the week. Even an hour spent baking can give you a freezer full of homemade snacks that you can reach for when the week gets hectic. I’ll often make a batch of these rolls while I’m doing other things around the kitchen. Once they’re baked, cooled and packed away, I know I have something ready for the lunch boxes.And honestly, future me is always very grateful!
Why You’ll Love These Soft Small Wholemeal Rolls
- Freezer-friendly – Make a batch at the weekend and pop them in the freezer so you have homemade rolls ready for busy mornings.
- Easy to make – A simple bread recipe that’s perfect for a little weekend baking.
- Great for lunch boxes – Fill them with ham and cheese, chicken, egg, tuna or your favourite sandwich filling.
- Made with wholemeal flour – A simple way to add more whole grains to homemade lunches.
- Budget-friendly – Making your own rolls can be a great way to save money compared with buying individual rolls or packaged snacks.
- Perfect for busy families – A little weekend preparation means one less thing to worry about when the school week gets hectic!
Back-to-School Kitchen Tips
When school starts back, I find that a little preparation in the kitchen can make the whole week run much more smoothly. The days are busy enough with homework, clubs and after-school activities, so anything that saves time is a bonus!
- Do a little baking at the weekend – Even an hour can make a big difference. Make a few batches of snacks and freeze them for the week ahead.
- Use the freezer – Homemade rolls, muffins, pancakes and other baked treats can be frozen and taken out as needed.
- Prep lunch-box fillings – Have a few easy options ready in the fridge so you’re not trying to think of something at 7am.
- Make extra – If you’re cooking dinner, make a little extra where you can. Leftovers can often become an easy lunch the next day.
- Keep snacks together – Have a dedicated cupboard or basket for lunch-box snacks so everything is easy to find.
- Get the kids involved – Older children can help choose fillings, pack snacks or prepare some of their lunch. It’s one less job for you and a great way to get them involved.
- Keep it simple – School mornings are not the time for complicated recipes! Have a few reliable favourites that you know everyone enjoys.
- Make a weekend baking list – I like to have a rough idea of what I want to make before the weekend starts. It means I can get everything done without spending ages wondering what to bake.


A little bit of planning at the weekend really can make those busy school mornings that little bit easier. And there’s nothing better than opening the freezer and knowing you have homemade goodies ready to go! These 20 Back to school lunchbox recipes are always on rotation in my kitchen.
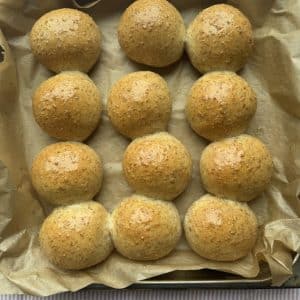
Soft Small Wholemeal Rolls
Equipment
Ingredients
- 300 g strong white bread flour
- 200 g strong wholemeal bread flour
- 7 g fast-action dried yeast
- 1 tsp caster sugar
- 1½ tsp salt
- 2 tbsp olive oil
- 320 ml warm water ideally 36ºc, body temperature
Instructions
- Combine the flours, yeast, sugar and salt in a large bowl.
- Add the olive oil and warm water and mix to form a dough.
- Knead by hand or in a mixer for 8–10 minutes until smooth and elastic.
- Place in a lightly oiled bowl, cover and leave to rise for 1-2 hours, or until doubled in size.
- Divide into 12 equal pieces and shape into smooth rolls.
- Arrange on a lined baking tray or in a roasting tin, leaving a little space between each roll. Cover and leave to prove for 1-2 hours, or until doubled in size.
- Bake at 180°C fan for 18–20 minutes, until golden and hollow sounding when tapped. For a softer crust, brush with butter or place a clean tea towel over the rolls while they cool.
- Cool on a wire rack.
- Tips:-Ideal in the lunchbox.-Always check that the yeast is in-date.-For the first and second prove, wait for the dough to double in size or the rolls will be dense.-Sprinkle with oats or seeds before baking for extra texture.
- Storage: Store in an airtight container for up to 3 days or freeze for 3 months.